This post was copied from the old web site (and reformatted), it describes the steps taken by Geoff Marks dropping and refitting the keel on "Zethar" in 2004. It is for illustrative purposes only, professional advice was taken before starting and during the job and you should do the same.
The Achilles cabin is built around a moulded grp liner which includes spaces for the sink and cooker and support for the cushions in the quarter berths and the double berth forward, all with stowage space beneath. The moulding also provides extra stiffening and rigidity to the hull and support for the bulkhead beneath the mast step.
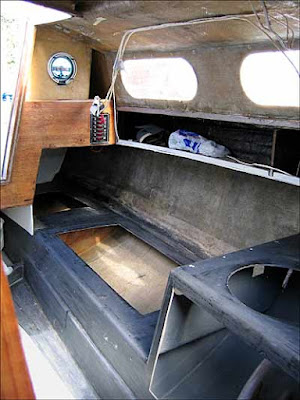
After close to 30 years use the cabin was in need of a tidy up.
 |
The partly stripped cabin after she was lifted out at the end
of the 2003 season. All pictures by: Geoff Marks |
The original plywood saloon headlining was sagging and the vinyl was showing quite a few scars. The cabin décor was finished with the internal grp sporting black gel coat which must have seemed like a good idea at the time of building but did nothing to enhance what is a smallish space. It was going to have to be white.
The wooden cooker and sink locker doors and the veneered ply bunk boards along the quarter berths were all showing their age. The small bulkheads at the aft edges of the sink and cooker spaces were removed and without them the cabin seemed bigger, so they were not replaced. The windows needed to be renewed as the Perspex had been cut incorrectly making the fixing screws too close to its edge and the bottom of the window holes in the coach roof sides. Also the screws used had been too long and had pierced the vinyl around the windows.
The head, skin fittings and seacocks were replaced in the winter of 2001/2. The head is a Jabsco with a compact bowl which fits neatly into its space on a glassed in plywood floor. The old skin fittings were seized solid and could not be undone so were removed by grinding off the outboard flanges. The original seacocks were condemned and replaced with new and the seacock for the sink has also been replaced.
The vinyl was peeled off with each section labelled for pattern making. All the old glue had to be removed too, and this was done with a cup wire brush in one electric drill and a 'face off' disk in another. The wire brush took the worst off and the face off disk did what it was supposed to and cleaned down to the grp surface without damaging it.
The shiny black gel coat needed to be sanded off to give a good key for the paint so was sanded with wet and dry sandpaper until it was a dull grey.
Gluing the headlining was as fiddly and time consuming as expected. Each section was cut using the old pieces as patterns but allowing an edge for trimming and fitting except where the pieces fitted hard under the shelves.
There an exact line was cut from the old pieces so that we could glue along under the shelves and use that as a datum for alignment and when it came to glueing this idea worked well. The fore cabin was done first and the deck head was the most difficult.
In the concave curves under the forehatch bubbles kept appearing so we had to shore it up with whatever we could find. After being left overnight the bubbles were gone and the vinyl was well stuck.
Below shows one of the last big pieces to go on. At this stage it has been glued along under the shelf the next stage is to with the glue to start coating the rest of the hull down to the ridge where the cabin moulding is glassed to the hull.
Next was the painting. This picture below was taken after finishing the first coat of undercoat. This was later followed by a second undercoat and then a coat of half and half undercoat and gloss, before the final coat of gloss.
The vinyl around the windows (after they had been replaced, see the next post) was tackled next and went on easily with only a small amount of fitting needed at the fore and aft ends as the top and bottom edges would be covered by the deck head lining and the shelf fronts.
The saloon headlining was done using veneered ply panels reclaimed from some internal doors with the panel joints and edges trimmed with hardwood strips.
 |
| The finished cabin. |
 |
| Before and after. |
 |
| Before and after. |
The cost of refitting the cabin and replacing the windows was just under £500. The most expensive item was the vinyl with glues and absolutely essential respirator masks. Do not tackle vinyl glueing without them!
Geoff Marks


No comments:
Post a Comment