It will be 2 weeks tomorrow that I posted an announcement regarding the "Resources Page" here and elsewhere. So far there have been no comments or recommendations. If none are forthcoming, I will delete the "Resources page" next week.
Tuesday, December 14, 2021
Friday, December 3, 2021
Old web site no longer available the new one is active.
www.achillesyachts.co.uk/ and achillesyacht.blogspot.com/ should now both take you to this site.
If it does not work right now (15:00 UCT Friday 3/12/21) check the URL, if its right try again tomorrow, it could just be a delay in updating the DNS server you are using.
If your "favourites" link includes a page ID e.g. http://www.achillesyachts.co.uk/pagenn that will not work.
if the http:// prefix is used it will automatically be changed to https://
Wednesday, December 1, 2021
Web site resources page:
Following a suggestion on Flickr I have put up a trial page for supplier recommendations. I have put mine on as a starting point, please review, comment and add your recommendations. If I get a reasonable number from several people I'll leave the page there, if there is little interest I will remove it.
Monday, November 29, 2021
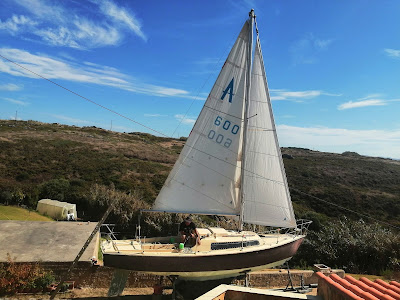
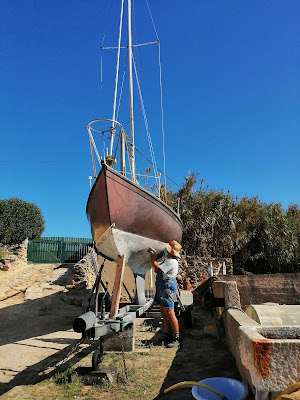
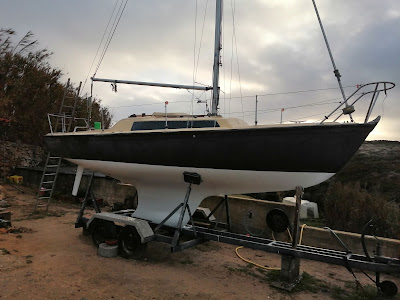
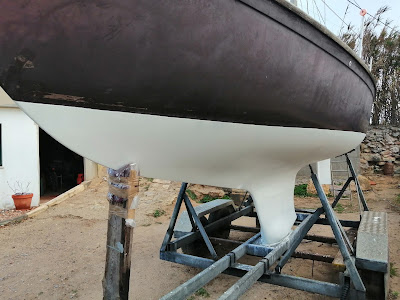
A24 600 "Flying Kipper" undergoing refurbishment.
By João Américo Patrão
My Achilles was purchased in Poole Yacht Brokers in 2008, came to Portugal by ferry boat via San Sebastian in Spain, the person who bought it then brought it to Portugal towed by a car, the boat had another name "Dolphin UK", but I decided to take it back to its first name "Flying Kipper", I think the names of the boats should not be changed.
In 2013 I bought the boat and for about 2 years I have been doing a total restoration.
The boat has never been on the water since it came from the uk, I'm working to get it to go to this sea of ours in 2022.

Sunday, November 28, 2021
Yet more changes to reporting requirements leaving or arriving in UK (including to / from IRE)
All change again and now including NI - Ireland
Notice 8: sailing your pleasure craft to and from the UK - GOV.UK (www.gov.uk)
Saturday, November 27, 2021
Protect your P bracket!
This may be an unusual problem as I have not found other owners who have experienced it, perhaps they have been lucky, but Sancerre's bronze P bracket was rotting from galvanic action to the extent that small pieces could easily be removed with a screw driver. Fortunately the damage was limited to the front of the lower "hub" section, its structural integrity was not affected and after grinding the degraded material away the cutlass bearing could be refitted with no play in it.
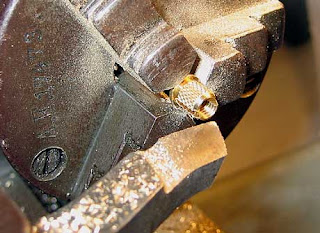
 |
| One of the pair of P-Bracket anodes after just one year before I fitted a galvanic isolator. Those on the shaft were also heavily eroded. |
For 2021 I installed a galvanic isolator in the mains power system, always a good idea but not something I had got round to doing, I also renewed the "P" bracket anode and to be on the safe side I replaced the wiring for the bilge pump which had a set of connecters that could have rested in bilge water.
Hopefully the problem is now sorted, I shall find out when I get to check the anodes when the boat is lifted but when I dived on the boat in August all of the anodes looked to be in far better shape than I would have expected in previous years.
Tuesday, November 23, 2021
Old site to close shortly
The A24 sail number register has now been transferred would A24 owners please review and update us. The old site will close down when the URL has been redirected here.
Saturday, November 20, 2021
New web site
I believe that all the data, except the A24 sail number register, has been transferred. If anyone sees anything missing please let me know ASAP. The site should go live by the end of the month assuming the URL for the old site can be redirected in a couple of days.
Thursday, November 11, 2021
Adverts on the old web site
This web site should go live in the next couple of weeks replacing the old one.
I have contacted those who have an advert there posted in the last 18 months and that have an email address. If any one not contacted has an ad that should be moved over let me know ASAP.Wednesday, November 10, 2021
Example Post by e-mail
Posts sent by email go to admin ( AchillesYachtOwners@Gmail.com ), who forward it to the blog, this is to prevent spam and inappropriate posts whilst allowing posting without having to have posters registered as users etc.
See the “Introduction” page Achilles Yacht Owners Association: Introduction or above for acceptable use and general guidance (both WIP as at 1st Dec 2021).
--------------------------------------------------------------------------
From: John
Sent: 10 November 2021 10:32
To: AchillesYachtOwners@Gmail.com
Subject: Example Post by e-mail
This was posted by email after being composed using Microsoft Outlook, the instructions below relate to that client, other e-mail clients should be able to do similar.
To allow formatting and in line images E-mails should be sent in HTLM format, “Rich Text” WILL NOT WORK. An email in “Plain Text” will delete in line pictures, tables etc., depending on the mail client these may be moved to attachments but they will not carry through to the blog. Most modern email clients will default to HTML but check your settings, in Outlook the format for an individual email can be set under “Format Text”
So do not attach pictures, use the “insert function” and select “Pictures” etc.

Then adjust the size appropriately and if it is a very big file compress it (in outlook click on the picture and select “Format Picture” from the top menu). Failure to compress may result in exceeding Goggles message size limit (I don’t know yet what that is) and could cause problems for admin trying to forward the post to blogger when out sailing with limited bandwidth.
Setting picture alignment left and centre will work but text wrapping does not.
- Bullet points will carry forward
- Example
- So will numbered lists
- Example
Links to other sites like this https://flic.kr/p/2mFV1G7 will work but Flickr embedded pictures will not, others have not yet been tested but probably will not.
Tables formatted in the e-mail client
a | b | c |
1 | 2 | 3 |

Check the email carefully as once it is posted by email only an Admin can edit it.
Tuesday, November 9, 2021
A24 Window replacement
This post was copied from the old web site (reformatted and split into two parts), it describes the steps taken by Geoff Marks dropping and refitting the keel on "Zethar" in 2004. It is for illustrative purposes only, professional advice was taken before starting and during the job and you should do the same.
The line of the old sealant shows how close the Perspex was to the bottom edge of the midship and aft window holes. The gel coat had been lifted by the self tapping screws at most of the screw holes and they were all filled before new holes were drilled.


After a successful dry fit the windows were bedded

Geoff Marks
A24 Cabin Refit
This post was copied from the old web site (and reformatted), it describes the steps taken by Geoff Marks dropping and refitting the keel on "Zethar" in 2004. It is for illustrative purposes only, professional advice was taken before starting and during the job and you should do the same.
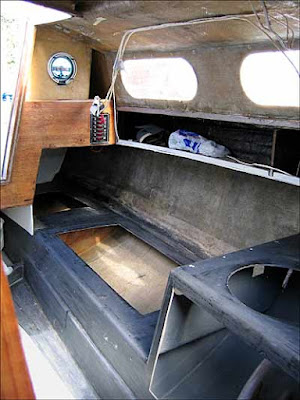
The Achilles cabin is built around a moulded grp liner which includes spaces for the sink and cooker and support for the cushions in the quarter berths and the double berth forward, all with stowage space beneath. The moulding also provides extra stiffening and rigidity to the hull and support for the bulkhead beneath the mast step.
After close to 30 years use the cabin was in need of a tidy up.
 |
| The partly stripped cabin after she was lifted out at the end of the 2003 season. All pictures by: Geoff Marks |

The head, skin fittings and seacocks were replaced in the winter of 2001/2. The head is a Jabsco with a compact bowl which fits neatly into its space on a glassed in plywood floor. The old skin fittings were seized solid and could not be undone so were removed by grinding off the outboard flanges. The original seacocks were condemned and replaced with new and the seacock for the sink has also been replaced.

The shiny black gel coat needed to be sanded off to give a good key for the paint so was sanded with wet and dry sandpaper until it was a dull grey.


There an exact line was cut from the old pieces so that we could glue along under the shelves and use that as a datum for alignment and when it came to glueing this idea worked well. The fore cabin was done first and the deck head was the most difficult.

In the concave curves under the forehatch bubbles kept appearing so we had to shore it up with whatever we could find. After being left overnight the bubbles were gone and the vinyl was well stuck.
Below shows one of the last big pieces to go on. At this stage it has been glued along under the shelf the next stage is to with the glue to start coating the rest of the hull down to the ridge where the cabin moulding is glassed to the hull.

Next was the painting. This picture below was taken after finishing the first coat of undercoat. This was later followed by a second undercoat and then a coat of half and half undercoat and gloss, before the final coat of gloss.


 |
| The finished cabin. |
 |
| Before and after. |
 |
| Before and after. |

The cost of refitting the cabin and replacing the windows was just under £500. The most expensive item was the vinyl with glues and absolutely essential respirator masks. Do not tackle vinyl glueing without them!
Geoff Marks
Monday, November 8, 2021
A24 Keel Dropping & more on Keel Bolts
This post was copied from the old web site (and reformatted), it describes the steps taken by Geoff Marks dropping and refitting the keel on "Zethar" in 2004.
It is for illustrative purposes only, professional advice was taken before starting and during the job and you should do the same.
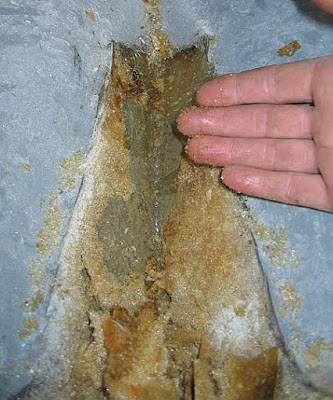
The aft keelbolt was replaced and associated repair work done in the winter of 2002/3 (click here). Epoxy filler was used at the keel but when lifted out at the end of 2003 it had not bonded to the cast iron. There was a hairline crack and after a couple of days ashore water was seeping out, so the filler was removed and the gap left to dry under a plastic sheet taped to the hull. Repeated attempts to fill the gap through the following Spring after many weeks of drying always ended in failure with the filler bubbling.

By the time we produced the bubble above, she had been out of the water for over six months. The likeliest explanation was that there was still moisture in the gap. In curing the original keel bolt problem we found that there was expanded foam under the grp cabin moulding between it and the hull at the bilge, and the concern was that the leak had let water between the hull and the liner rather than just up around the keel bolt. There were four filled holes on the moulded step for the cabin sole boards. I dug out a plug of filler and there was foam that was saturated.


With a length of small diameter pipe on the end of the vacuum cleaner it was a case of dig a bit, suck a bit, until as much as was possible was removed.
The only area left was under the glassed in limber pipe beneath the cockpit sole which was cut out to find more wet foam.
With the reservoir of water now gone another attempt was made to fill the keel. This time after a few days two bubbles formed and when they were cut into rusty water wept out.
The only way to properly sort this out was to drop the keel and advice from a surveyor confirmed that it was the thing to do.
The boat was moved into 'The Tent' by a very clever fully adjustable trailer best described as a giant tuning fork with wheels at the 'prongs' ends and a tractor at the other.


The sealer in the keel join was cut with fine toothed hacksaw blades. It was cut in about 10 inches forward and 12 inches aft until we got towards where the grp keel stub was touching the cast iron leaving no more room to cut. Softwood wedges were tried but their tips only squashed until they split so new hardwood wedges were used. With them and a 7lb sledgehammer the removal became easy. The sealer holding the keel began to split until it had cracked along half the keel which had dropped about 1/4 of an inch (6mm) at the forward end. The join crackled gently and the keel dropped half an inch onto its waiting blocks.

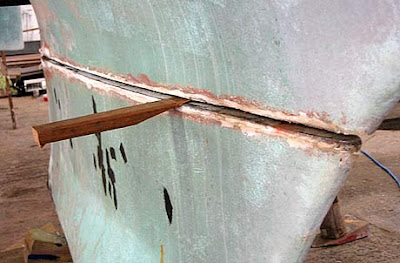
 |
| With the keel off the source of the problem was revealed. |


The keel stub was cleaned ready to be re-joined to the keel and the picture shows the cleaning half done. The 'face off' disk used for removing the vinyl glue in the cabin was perfect for the job.


Sealer squeezed out when the boat was lowered again and this was quickly scraped off before the nuts were put on the studs and tightened, making a second 'squeeze'.
The nuts were gradually fully tightened over the next few days, a half turn at a time. Butler Mouldings used a two-part Polysulphide sealer to bed the Achilles keels. The only Polysulphide I could find was one part Boatlife Lifecalk, which is flexible, can be sanded to a smooth finish, does not have strong adhesive properties and is slow to cure. Modern sealers like Sikaflex are Polysulphates which are faster curing but have very strong adhesion.
I had been warned by the surveyor that if I used Sikaflex I would never get the keel off again. So the Lifecalk was used which cured slowly but was easily faired.

Then a coat of antifouling to finish the job.

A few thoughts.
There was rust in the area around the aft keel bolt which was anticipated from the leak, but the unexpected rust was where the water must have been seeping aft from the leak along the keel join and so behind the fairing filler at the keels edge. This was the seat of the moisture that caused the bubbles in the filler. It is impossible to say when the original leak and resulting rust occurred but it looked like it had been corroding for some time and there was the distinctive whiff of iron rusting is salt water.
The good news is that the remainder of the keel was perfect under the skin of old sealer and easily cleaned to a polished finish.
Also the keel bolts were all in excellent nick after 29 years and could have been re-used although the nuts were solidly rusted to the studs. Only the aft keel bolt has the mico-balloon block for supporting the grp. The other three bolted down onto what seemed to be solid grp which at the midship pair of bolts was about 3 inches (75mm) thick. The aft one (left) was new in 2003 but you can see there is rust on the bottom of the thread. This is because it had been taken out a couple of weeks before the pic was taken as part of a vain attempt to vent the pressure that was blowing bubbles in the keel filler.

The Ultimate Tensile Strength of mild steel is 470 Newtons per square mm with one Newton equalling 0.22 pounds of force. This calculates to a 1 inch mild steel bar being able to take a load of 23 tonnes. Of course the keel studs are threaded which reduces the cross sectional area and the threading may reduce the strength further. If we allow a reduction of 25% this still gives a theoretical ability for the four keel bolts to take a load of around 60 tons [Update 2021 by JDL: according to an on-line calculator a 1" course thread, low carbon steel bolt will support about 13.6 Tonnes, x 4 = 54.5 Tons] and this to hold a keel of just over half a ton. This is static load only and a boat pitching in a seaway is bound to increase that load although I couldn't begin to work out by how much. Would it be approaching 60 tons? I very much doubt it. I also came across something called Nevin's Rule which states that you need 1 square inch of bolt for every 1500lbs of ballast, so the Achilles 24 is well in excess of that. Please bear in mind I am not a surveyor, naval architect or mathematician so the above is only a guide - if it is correct!
With the class getting older the question of keel bolt condition is quite rightly coming up, but if the experience with the condition of these 29 year old bolts is anything to go by - I am fairly confident they are the originals - it suggests that there is not a lot to worry about.
Geoff Marks
Subscribe to:
Posts (Atom)